I think all of use are using android pps in our day to day life whether it’s Whatsapp or Facebook. If you are well connected with Tech and you’re a News Reader, you must have come across Online News Providing Apps. So, You might have wondered how they operates such cumbersome work into an app. Don’t worry Guys When i am here, then no fear. Here’s the guide for you to convert your website into an app.
First of all let me clear you, If you have knowledge about coding and java mainly you’ll get to know why we have used these codes here. If you are a beginner yet, we will explain all the codes for you. Moreover, if this article will help you, must comment down a Thanks. As it motivates us to do even more better.
Table of Contents
HIGHLIGHTS :
- Android App Development via Java.
- Convert Website into an Android App.
- Steps and Software we are using to finish the task.
- And many more, just stay connected.
Prerequisites To Make Android App:
{Caution – Kindly proceed if you have fulfilled these requirements}
- Android Studio {You can download this software from the Android Studio homepage}
- A Responsive Website {For Example – https://www.careerhigh.com}
- A Smartphone with Internet to Test Your Application.
- You and your focus and nothing else 🙂
Steps To Convert Website Into App :
1. {Running Android Studio and Creating an Empty Activity}
2. {Open res -> layout -> activity_main.xml (or) main.xml, create the application interface and Remove all the codes and add Below given web view element to it.}

<?xml version="1.0" encoding="utf-8"?>
<RelativeLayout xmlns:android="http://schemas.android.com/apk/res/android"
    xmlns:tools="http://schemas.android.com/tools"
    android:id="@+id/activity_main"
    android:layout_width="match_parent"
    android:layout_height="match_parent"
    android:paddingBottom="@dimen/activity_vertical_margin"
    android:paddingLeft="@dimen/activity_horizontal_margin"
   android:paddingRight="@dimen/activity_horizontal_margin"
    android:paddingTop="@dimen/activity_vertical_margin"
    tools:context="com.example.webviewapp.MainActivity">

 <WebView
        android:id="@+id/webview"
        android:layout_width="match_parent"
        android:layout_height="match_parent" />
</RelativeLayout>
3. {Open src -> package -> MainActivity.java. Here firstly declare a webview variable, make JavaScript enable and load the URL of the website. See the whole code below.}
Important Note: You can replace our url in below code with any other url you want to convert it into Android App.
package com.example.webviewapp;

import android.support.v7.app.AppCompatActivity;
import android.os.Bundle;
        import android.webkit.WebSettings;
        import android.webkit.WebView;
        import android.webkit.WebViewClient;

public class MainActivity extends AppCompatActivity {
    private WebView mywebView;
    @Override
    protected void onCreate(Bundle savedInstanceState) {
        super.onCreate(savedInstanceState);
        setContentView(R.layout.activity_main);
        mywebView = (WebView) findViewById(R.id.webview);
        WebSettings webSettings= mywebView.getSettings();
        webSettings.setJavaScriptEnabled(true);
        mywebView.loadUrl("https://abhiandroid.com/");
    }
}
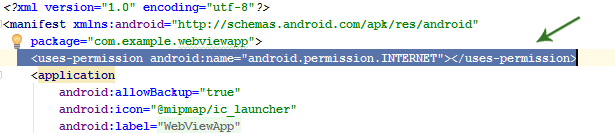
4. {Open AndroidManifest.xml file and add internet permission to it just after the package name. It is required because the App will load data directly from the website.}
<uses-permission android:name="android.permission.INTERNET"></uses-permission>
5. {After adding the permissions the application is complete but when you run you will find that it will open the links in browser not in application itself. Solution for this is add this line of code in your MainActivity.java class.}
mywebView.setWebViewClient(new WebViewClient());
6. {Now to add back buttons to the application to need to add following code to your MainActivity.java class.}
    public void onBackPressed() {
        if(mywebView.canGoBack())
        {
            mywebView.goBack();
        }

        else{
            super.onBackPressed();
        }
    }
7. {Further if you want to remove the additional padding in the app, open activity_main.xml and in the layouts remove the padding(bottom, top, right, left). Here’s the final code.}
activity_main.xml
<?xml version="1.0" encoding="utf-8"?>
<RelativeLayout xmlns:android="http://schemas.android.com/apk/res/android"
    xmlns:tools="http://schemas.android.com/tools"
    android:id="@+id/activity_main"
    android:layout_width="match_parent"
    android:layout_height="match_parent"
    tools:context="com.example.webviewapp.MainActivity">

// WebView Element
    <WebView
        android:id="@+id/webview"
        android:layout_width="match_parent"
        android:layout_height="match_parent" />
</RelativeLayout>
MainActivity.java complete code:
package com.example.webviewapp;

import android.support.v7.app.AppCompatActivity;
import android.os.Bundle;
import android.webkit.WebSettings;
import android.webkit.WebView;
import android.webkit.WebViewClient;

public class MainActivity extends AppCompatActivity {
    private WebView mywebView;
    @Override
    protected void onCreate(Bundle savedInstanceState) {
        super.onCreate(savedInstanceState);
        setContentView(R.layout.activity_main);
        mywebView = (WebView) findViewById(R.id.webview);
        WebSettings webSettings= mywebView.getSettings();
        webSettings.setJavaScriptEnabled(true);
        mywebView.loadUrl("https://abhiandroid.com/");
        // Line of Code for opening links in app
        mywebView.setWebViewClient(new WebViewClient());
    }

//Code For Back Button
@Override
    public void onBackPressed() {
        if(mywebView.canGoBack())
        {
            mywebView.goBack();
        }

        else
        {
            super.onBackPressed();
        }
    }
}
* Bonus Tip For WebView App : In addition if you want to remove the default action bar, see in image the blue top header. You just need to make a little change in styles.xml file.
And, That’s it. You will be ready with your Wonderful Android App in just few minutes. 😊
Final Conclusion…
So, that’s all for Today. We will meet you in our another Tech Article in Trenovision.com. Till then Good Bye and have a nice day. Don’t forget to Subscribe our Newsletter. And, do comment down below in the comments section that how much you liked our creation and Share it with your friends too.
Thanks For Reading