Common Windows 7 Problems
- DVD drive not found
In some cases your DVD drive may not be found by Windows 7, even if it’s visible in the BIOS and using the standard driver.
The standard solution here is to run REGEDIT, browse to HKEY_LOCAL_MACHINE\SYSTEM\CurrentControlSet\Control\Class\, then delete both UpperFilters and LowerFilters in the right-hand pane (UpperFilters.bak and LowerFilters.bak entries can be ignored).
No change? Resetting the drive letter has worked for some. Click Start, type Disk Management and choose the “Create and format hard disk partitions” link. If your optical drive is visible here then right-click it, select Change Drive Letter and Paths, click Change and choose a new letter. If the drive is now visible in Explorer, then repeat the process to change the drive letter back; if it’s still not visible, reboot and it should appear.
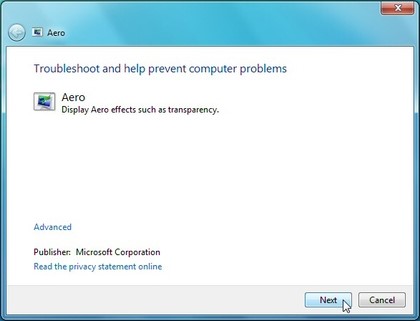
- Aero isn’t running
If Windows 7 isn’t looking its best – transparency has been turned off, say – then the Aero theme may not have been fully enabled on your system. Click Start, type Aero, choose the “Find and fix problems with transparency and other visual effects” link, and click Next to launch the Aero troubleshooting wizard. It’ll try to identify and resolve problems. And if it doesn’t, then install the latest driver for your graphics hardware. That could be all your system needs.
Some Aero features may be disabled in the Registry, though. For example, if Aero Peek (the ability to make open windows transparent to display your desktop underneath) doesn’t work for you, then launch REGEDIT, browse to HKEY_CURRENT_USER\Software\Microsoft\Windows\DWM and make sure EnableAeroPeek is set to 1, rather than 0.
- Aero Snap irritations
Windows 7’s new ability to move and resize windows, all in one movement, can be a genuine productivity boost. But if you find windows moving around when you don’t expect it then Aero Snap is more of an annoyance than anything else, though at least it’s one you can disable in just a few seconds.
Launch Control Panel, click Ease of Access, and select either “Change how your mouse works” or “Change how your keyboard works“. Then browse down to the “Make it easier to manage windows” section, check “Prevent windows from being automatically arranged when moved to the edge of the screen“, click OK, and program windows now won’t go anywhere unless you specifically command it.
- Windows 7 themes change your custom icons
Windows 7 has some spectacular new themes – there’s a great selection at the Microsoft site – but installing them can have one annoying side-effect. If you’ve previously changed a system icon like Computer or the Recycle Bin then that could disappear, replaced by the equivalent icon from the theme pack.
To prevent this, right-click an empty part of the desktop, select Personalize > Change Desktop Icons, clear the “Allow themes to change desktop icons” box and click OK. Your icons will now be preserved, and the only way to change them will be manually, from the same Desktop Icons dialogue.
- Taskbar problems
We like the new Windows 7 taskbar, but many people seem less than impressed with the new approach to taskbar buttons, finding it difficult to tell at a glance whether an icon is a running application or a pinned shortcut. If this sounds like you then there’s an easy way to restore more standard taskbar buttons, though – right-click the taskbar, select Properties, and set Taskbar Buttons to “Never combine” or “Combine when taskbar is full”.
You can even restore the old Quick Launch toolbar in just a few clicks. Simply right-click the taskbar, click Toolbars > New Toolbar, type %userprofile%\AppData\Roaming\Microsoft\Internet Explorer\Quick Launch in the folder box and click Select Folder. The Quick Launch toolbar should then reappear, and you can move and resize it to suit your needs.

- Missing Explorer folders
Click Start > Computer in Windows 7 and you’ll find system folders like Control Panel and the Recycle Bin are no longer displayed in the left-hand Explore pane. This seems like a backward step to us, but there’s a quick solution. Click Tools > Folder Options, check “Show all folders”, click OK and all your top-level system folders will reappear.
- Missing applets
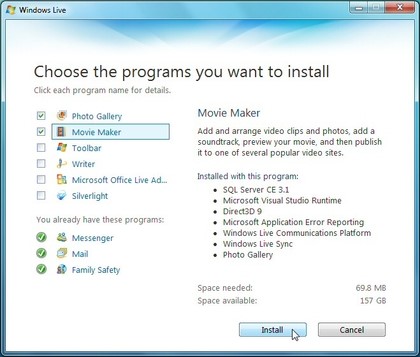
Windows 7 installs quickly and takes up less hard drive space than you might expect, but in part that’s down to cheating – Mail, Movie Maker, Photo Gallery and other applets are no longer bundled with a standard Windows installation. Instead you must download the programs you need from the Windows Live Essentials site.
Installing Live Essentials will also get you potentially unnecessary extras, though, like an ActiveX control to help in uploading files to Windows Live SkyDrive. And the Windows Live Sign-In Assistant, which can be useful if you want to switch between multiple Windows Live accounts. If you have only one Windows Live account, and no plans to use Live SkyDrive, then these can safely be removed from the Control Panel Uninstall A Program applet.
- Too many Minidumps
By default Windows 7 now keeps the last 50 minidump files (memory images saved when your PC crashes). If you’re keen on using dump files to troubleshoot crashes then this is good news, but if you’ve no interest in that kind of advanced debugging then minidumps are just wastes of your valuable hard drive space. In which case you should run REGEDIT, browse to HKEY_LOCAL_MACHINE\SYSTEM\CurrentControlSet\Control\CrashControl, and set MiniDumps Count to 1. Windows will only now keep the last dump file and you’ll free up a little hard drive space.
- Hidden Extensions
Explorer’s default settings in Windows 7 hide file extensions, as well as system files and folders.
To fix this, launch Explorer and click Tools > Folder Options > View.
Clear the “Hide extensions for known file types” to show file extensions, reducing the likelihood that you’ll accidentally double-click on virus.txt.exe in future.
And as long as there are no novice users on your system who might go poking around in Explorer, we’d also choose to “Show hidden files and folders” as well as clear the “Hide protected operating system files” box. It’s often important to see these files when you’re troubleshooting, or following problem-solving instructions from someone else.
- DVD audio issues
Windows 7 runs well even on old notebooks, say reviewers, and in general they’re right. But we have seen reports of problems, for example with DVD audio, where movie sound is either completely unintelligible or doesn’t appear at all.
Should anything similar happen to you then head off to Control Panel, click Hardware and Sound > Sound, right-click your current default playback device (it’ll have a green tick displayed) and select Properties.
Then click Advanced, clear any settings in the Exclusive Mode box and click OK. You’ve now ensured that older or badly-behaved drivers can’t take complete control of the speakers any more, and this alone will often be enough to get your system working again. (But if it doesn’t, installing new audio drivers is your next best option.)
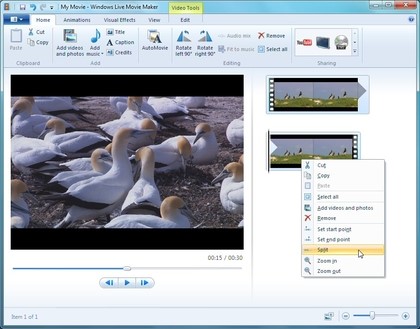
- Windows Live MovieMaker
For some bizarre reason Windows Live MovieMaker won’t let you import network files by default. Okay, so they’ll be large and may monopolize network traffic for a while, but shouldn’t that be your choice?
Anyway, a quick Registry tweak will solve this annoying problem. Simply run REGEDIT, browse to HKEY_CURRENT_USER\Software\Microsoft\Windows Live\Movie Maker, add a DWORD value called AllowNetworkFiles and set it to 1: job done.
- XP Mode doesn’t work
If you’ve ancient software that won’t work under Windows 7 then in theory you can use XP Mode, a virtual machine with an installation of Windows XP that should be more successful. In practice, however, it doesn’t always work out that way.
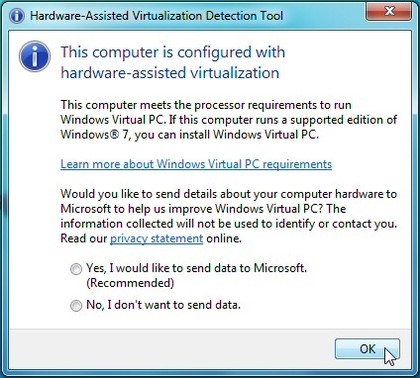
- Problem 1 is XP Mode requires hardware support from the CPU. The Microsoft Hardware-Assisted Virtualization Detection Tool can check your system to see if it’s compatible.
- Problem 2 is the feature must be enabled in the BIOS. Microsoft has some instructions, but essentially you just need to browse your BIOS setup program looking for an AMD-V, Intel VT or VIA VT virtualisation setting and ensure it’s turned on.
Unfortunately problem number 3 is that some laptop manufacturers have previously disabled this setting for “security” reasons. Sony Vaios had the feature turned off for a while, for instance, prompting some to recommend ways in which you can edit their firmware to restore the setting, although Sony seems to have restored it recently. If hardware virtualisation is turned off on your system then check with the manufacturer – a BIOS upgrade may fix the problem.
And if all else fails, just use a package like VirtualBox that doesn’t insist on hardware support. You will need to provide a licenced copy of XP (or whatever other version you want to use) to install on it, though.
- Add Windows Media Center to AutoPlay options
Windows 7 includes Media Center, but for some strange reason you can’t choose it as an AutoPlay handler. The only standard program that can be launched to play DVD-Video discs, say, is Media Player, which seems an odd limitation.
Fortunately there’s no fundamental change that’s preventing this from working, it’s just that Windows 7 doesn’t contain the required Registry entries. If you’ve a Windows Vista PC to hand then you could export this yourself: just go to HKEY_LOCAL_MACHINE\SOFTWARE\Microsoft\Windows\CurrentVersion\Explorer\AutoplayHandlers and save all the keys and values beginning with EHome.
- Missing crash dump files
Impressive though Windows 7 is, it’ll crash sometimes, and if you’ve installed diagnostic software like the Windows debugging tools then you’ll want the crash dump file to hand for further investigations. And yet in some situations you’ll find the memory.dmp file never appears. So what’s going on?
First, click Start, right-click Computer and select Properties > Advanced System Settings > Startup and Recovery Settings. Make sure that “Write debugging information” is set to something other than “none”, and that “Dump file” is the default “%SystemRoot%\MEMORY.DMP“.
If that’s all correct then check your free hard drive space. If your system isn’t on a domain, and has less than 25GB free, then Windows 7 will no longer keep a crash dump file. If you’d like to change that, launch REGEDIT, browse to HKEY_LOCAL_MACHINE\SYSTEM\CurrentControlSet\Control\CrashControl, create a new DWORD value called AlwaysKeepMemoryDump, set it to 1, and in future the crash dump file will always be preserved.
- Can’t disable hibernation
Windows 7 doesn’t make it easy to turn off hibernation, annoying if you never use it as you’ll permanently have a “hiberfil.sys” file taking up a sizeable portion of your hard drive. To rectify this situation, launch REGEDIT, browse to HKEY_LOCAL_MACHINE\SYSTEM\CurrentControlSet\Control\Power, and set HibernateEnabled to zero.
- Poor video quality
The new Windows 7 power plan settings affect more of your software than ever before. If you notice video playback quality seems poor, for instance, then click Start, type Power Options and click the Power Options link. Click Change Plan Settings for your currently selected plan, click Change Advanced Settings, expand the Multimedia Settings section and make sure “Playing video” is set to “Optimise performance”.
Alternatively, if you often play video on a laptop, then change the new setting to “Optimise performance” and you may see an improvement in battery life.
- Explorer navigation
The Windows 7 version of Explorer has partly disconnected its two panes, so if you’re double-clicking your way down a complex set of folders in the right-hand pane, the left hand tree won’t always expand to follow you.
This may improve performance a little, but it also means that you won’t always be able to see the complete folder structure unless you expand it manually, which on balance seems a bad idea. If you agree then click Organize > Folder and Search Options, check “Automatically expand to current folder“, and click OK to restore normal operations.
- Windows Live Messenger and the system tray
Close Windows Live Messenger on Windows 7 and it’ll display its icon on the taskbar, chewing up useful application space, rather than in the system tray where many believe it belongs.
Fortunately there’s a very quick fix: right-click the shortcut to Windows Live Messenger, click Properties > Compatibility, check “Run this program in compatibility mode for” and choose “Windows XP (Service Pack 3)” from the list. Close Messenger and its icon should now appear in the system tray, just as you’d expect.