Risk Management – “Risk are future uncertain events with a probability of occurrence and a potential for loss”
A risk is defined as “an uncertain event or condition that, if it occurs, has a positive or negative effect on a project’s objectives.Risk is inherent with any project.”
Also Read : Credit monitoring and Collections | Explained
Table of Contents
Types Of Risk
A software project may encounter various types of risks:
- Technical risks include problems with languages, project size, project functionality, platforms, methods, standards, or processes. These risks may result from excessive constraints, lack of experience, poorly defined parameters, or dependencies on organizations outside the direct control of the project team.
- Management risks include lack of planning, lack of management experience and training, communications problems, organizational issues, lack of authority, and control problems.
- Financial risks include cash flow, capital and budgetary issues, and return on investment constraints.
- Contractual and legal risks include changing requirements, market-driven schedules, health & safety issues, government regulation, and product warranty issues.
- Personnel risks include staffing lags, experience and training problems, ethical and moral issues, staff conflicts, and productivity issues.
- Other resource risks include unavailability or late delivery of equipment & supplies, inadequate tools, inadequate facilities, distributed locations, unavailability of computer resources, and slow response times.
What is Risk Management Plan ?
A Risk Management Plan is a document prepared by a project manager to foresee risks, to estimate the impacts, and to create response plans to mitigate them.
- The risk management plan contains an analysis of likely risks with both high and low impact, as well as mitigation strategies to help the project avoid being derailed should common problems arise.
- Risk management plans should be periodically reviewed by the project team in order to avoid having the analysis become stale and not reflective of actual potential project risks.
- Most critically, Risk Management plans include a risk strategy. Broadly, there are four potential strategies, with numerous variations. Projects may choose to:
- Accept risk; simply take the chance that the negative impact will be incurred
- Avoid risk; changing plans in order to prevent the problem from arising
- Mitigate risk; lessening its impact through intermediate steps
- Transfer risk; outsource risk to a capable third party that can manage the outcome
What is Risk Management Planning ?
Taking the prioritized risk list as input, plans are developed for the risks chosen for action. Figure 2 illustrates the specific questions that can be asked to help focus on the type of planning required.

Stages of Risk Management in project management
The risk management plan thus becomes a straightforward byproduct of the processes like:
- Risk Identification
- Risk Analysis
- Risk Mitigation and
- Risk Monitoring
Software testing managers’ come across above four stages while managing risks associated with their projects & products which are explained below.
Stage – 1: Risk Identification:
- In risk identification the risks presented by the project & product are identified & documented for further analysis
- It is the initial step of recognizing what risks are present (i.e. what unwanted events might occur). At this stage the main priority is to ensure that as many risks as possible are identified rather than analyzing any of them in any depth. The emphasis is on taking the broadest possible view and involving as many different stakeholders as possible to ensure that risk is considered from many viewpoints.
- Techniques for identification are those that encourage an open mind and speculation; all ideas should be welcomed and captured. Later stages of the process will analyze and quantify the risks.
Following six identification techniques are most commonly used for risk identification.
a) Using Brainstorming Technique:
Brainstorming is an ideal technique for capturing ideas quickly. To be really effective a brainstorm session needs to be short and intense, while participants are in a creative mood. A conducive atmosphere is vital, and participants need to feel safe from criticism or ridicule. A facilitator should be appointed to control the activity and ensure that everyone is encouraged to contribute. During the risk brainstorm session everything suggested should be recorded (ideally on a flip chart or whiteboard, but a sheet of paper would do) without comment or analysis. The session should be kept going while ideas are flowing freely, but stopped as soon as there are gaps in the flow of ideas. Often a second session, after a little break and starting from the list generated by the first brainstorm session, can yield more ideas triggered by the initial list.
b) Organizing Risk Workshops:
A workshop is a more structured session than a brainstorm session. The aim is to have as many different stakeholder viewpoints represented as possible. However, the generally accepted view is that a workshop is more effective with 8—12 participants. As for the brainstorm session, a facilitator should be appointed to run the workshop.
c) Learning from the Past Lessons:
This technique capitalizes on knowledge gained from previous projects. Looking back over past projects to identify mistakes made and risks not well managed can be a powerful trigger for recognizing potential risks in a current project. In this case the technique depends on the existence of some records of past projects, in the form of post-project reviews or risk registers.
If a risk analysis was done for past projects and records kept, these can be useful if there are people available who were involved or who can remember the projects. This can be a good way to at least recognize risks that were not handled effectively in the past. If there are no records this is not a suitable technique, but it might be a good idea to begin keeping enough records to allow it to be used for future projects.
d) Conducting Interviews:
Interviews are a way to ensure that all stakeholder viewpoints are considered. More structured than a brainstorm or a workshop, an interview can ensure that every viewpoint is considered and it can also ensure that every stakeholder’s input is based on a consistent set of questions. An interview is inevitably more formal than a brainstorm or a workshop, and this may become an inhibiting factor; interviewees are likely to be less spontaneous and creative than in a workshop situation. Interviews can be a very good way to follow up on brainstorms or workshops to ensure that those who made little contribution are at least heard and to follow up on any questions raised by the brainstorm or workshop. The idea of workshops or brainstorming followed by interviews suggests a fairly time-consuming and expensive approach, but it will ensure that all participants have had the opportunity to contribute.
e) Carrying out Independent Assessment:
Independent assessment by an expert can help to ensure that all important areas are covered, but independent experts are likely to be expensive, so this is not an approach that would normally be used except where the cost is justified, for example if an organization is entering a safety critical area of application for the first time.
Of course an independent assessment does not necessarily require an expert and there may be specialists within the organization who are independent of the project that could carry out an effective risk assessment. This is still a relatively expensive approach, however.
f) Use of Checklists and Templates:
Checklists and templates are both ways to provide a starting point for the risk assessment. Checklists can be based on past experience, lessons learned or input from an expert, or they can just be copied from books or produced in a brainstorm or a workshop.
Templates, typically providing the main headings for a risk assessment document, are an alternative to checklists, or they may be used to ensure that the topics included in the checklist are included in the documentation. The main thing is that everything the organization considers important in a risk assessment is incorporated into these guidance documents. No matter how shaky the initial checklists or templates, they will improve if they are continuously updated from real project experience.
| Sr No. | Situation | Technique for Risk Identification |
| 1 | When we have individuals with knowledge of the technical and business domains. | Conducting Interviews |
| 2 | When we have access to information from previous projects. | Learning from the Past Lessons |
| 3 | When we do not have sufficient in-house knowledge, and have time and budget. | Carrying out Independent Assessment |
| 4 | When we have knowledge to provide a starting point of key areas to consider. | Use of Checklists and Templates |
| 5 | When we want to reach consensus on areas of highest risk. | Organizing Risk Workshops |
| 6 | When we want to gain an initial idea of potential risks. | Using Brainstorming Technique |
Stage – 2: Risk Analysis :
- The risks are analyzed to find out for their probability of occurrence & the impact they would have if they would have materialized. The product of probability & impact is the overall level of risk. This allows the risks to be ranked in order of the level of the risks.
- Risk analysis is about getting more information about the risks, especially the relative risk levels of the risks identified. Risk level is defined as the product of the probability of a risk occurring and the impact of the risk if it occurred. Thus if a risk had a probability of 1/100 of occurring and its impact would be a loss to the organization of $1,000, we would define the risk level as $10.
- The aim of risk analysis is, as far as possible, to quantify the risks so that they can be ranked and prioritized. The simple example given is untypical because neither the probability of occurrence nor the impact would normally be quantifiable as precisely as in the example, if at all. Nevertheless, the definition of level of risk is still useful. If precise quantification is not possible then some more qualitative measure of probability and impact can be used. Gradings of both probability and impact could be as simple as Low, Medium or High. We can use a 7 x 7 Risk Analysis Matrix to record risks by level as described in the following figure.
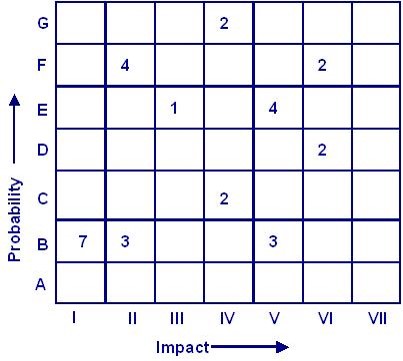
- If more is known, then finer grain estimates of probability and impact can be used. Instead of three levels for each there could be five, seven or even nine. The most important thing is that the matrix provides a basis for ranking risks and deciding on the priorities for risk mitigation.
- Following figure provides an example of a matrix with seven levels and populates the matrix with some examples of the number of unwanted events identified in the various combinations of probability and impact. Based on a populated matrix such as this a risk mitigation strategy can be worked out.
- In the above figure of example we see that the unwanted events associated with risks are spread around the matrix. A few are in the extreme corners of low impact and low probability, which can be ignored, or high impact and high probability, which demand attention. The more difficult judgments are around what to do about those that occur around the middle of the table, and here some closer examination may be necessary before a risk mitigation strategy is decided.
Stage – 3: Risk Mitigation
- Here each risk is considered for mitigation & mitigation actions are decided based upon the nature & level of the risk.
- Risk mitigation is the term used for the action we decide to take in tackling each risk. Mitigation actions can be anywhere on a spectrum from doing nothing at one end to doing as much as possible to eliminate the risk at the other end. In between there are many options, such as taking out insurance to cover any losses, spending extra money on specialist resources to tackle a high risk area more effectively than we could do for ourselves, or outsourcing a risky area to a third party who will take on the risk and compensate us if it materializes.
- Testing is a key element of risk mitigation because it can provide evidence of the effective countering of a risk. For example, if there is a risk that a system will have inadequate performance there will need to be development action to ensure that adequate performance is achieved, and it will then be performance testing that identifies objectively whether the performance is adequate or not. For this reason the testing associated with the higher risks needs to be the priority. This is the main principle behind risk-based testing.
Stage – 4: Risk Monitoring
Risk mitigation actions & risk levels are continuously monitored throughout the project to ensure that the overall risk levels remain acceptable.
Also Read : Credit Card Business Model | Detailed Key concepts
Developing Risk Management Plan
Developing a risk management plan is simply a matter of following the five steps described below.
Step-1: Creation of a risk categorization table
- Using different categories, a risk categorization table is constructed. This table is the starting point for identification of specific risks on each project.
- The project team can use this table to review categories of risk for their project. It also provides the team with a set of factors to consider, and provides slots for them to decide which factors are relevant and what evidence they have.
- As the organization learns more about its performance it may decide on ways to compare ratings on a given project with its prior history. It may determine total-rating count, or number of risks, or some combination of number and level of impact that predicts project failure or success.
Step-2: Ranking of the risks to the project for every category
- a) Risk factors and areas: Under each category, this column lists category risk factors.
- b) Low risk evidence (L): This column has characteristics of the risk factor when it can be considered as a low risk to the project.
- c) Medium risk evidence (M): This column has characteristics of the risk factor when it provides a medium risk.
- d) High-risk evidence (H): This column has characteristics of the risk factor when it should be considered as a high risk.
- e) Rating: Select the level of risk (For example : H, M, L or 3, 2,1) applicable to the concerned project.
- f) Comments: Provide information about project specifics that supports the rating choice.
It may be kept in mind that in some cases, evidence in one category for high risk may be evidence for low risk in another. For example, support for organization goals or use of new technologies may be taken either way, depending on the situation.
Following Tables indicates the risk factors and categories with their respective evidence of low, medium and high risk. These tables are nothing but templates that can be used as a starting point for any software development project. Categories, factors, and evidence can easily be modified within this framework for any project.
Step-3: Sorting of the risk table in the order of risk
Sorting of the risk table is done in order of risk with high-risk items being the first.
- # When “High” rating risks are more than ten; calculate the risk exposure. These become our key risks.
- # Identify different means to control every key risk, establish ownership of the desired action, and decide the date of completion.
- # Integrate the key risks into the project plan and find out the impact of decided schedule and cost.
Step-4: Design a risk format for regular weekly review
Establish a regular risk format for weekly project status meetings. At a minimum, show the status of the top ten, the ranking of each one from the previous week, and the number of weeks on the list. Show the risk response report and the risk change report.
Step-5: Continuity of Risk Management Process
The final step is to ensure that risk management is an ongoing process within your project management. Monitoring and control of the risk list must be done on a regular basis. The project manager and team must be aware of the identified risks and the processes for resolving them. New risks must be identified as soon as possible, prioritized, and added-on to the risk management plan. High-priority risks must be worked on with respect to the overall project plan.
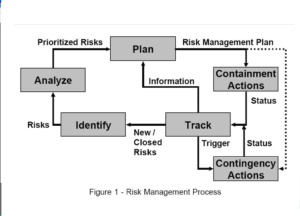
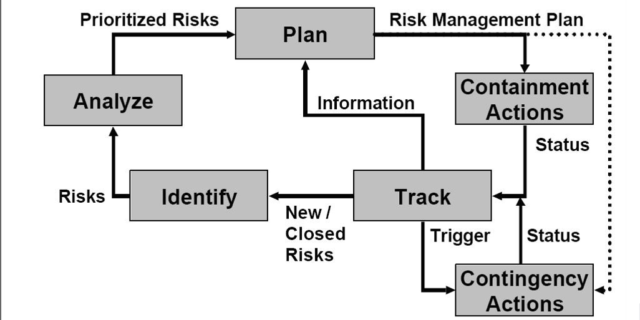
- Figure 1 illustrates the risk management process. This process starts with the identification of a list of potential risks.
- Each of these risks is then analyzed and prioritized. A risk management plan is created that identifies containment actions that will reduce the probability of the risk occurring and/or reduce the impact if the risk turns into a problem.
- The plan also includes contingency actions that will be taken if the risk turns into a problem and the associated triggers (indicators that the risk is turning into a problem).
- The containment part of the plan is then implemented and actions are taken. The tracking step involves monitoring the status of known risks as well as the results of risk reduction actions.
- If a trigger indicates the onset of a problem, the corresponding contingency plans are implemented.
- As new status and information are obtained, the risk management plans are updated accordingly.
- Tracking may also result in the addition of newly identified risks or in the closure of known risks.
- The risk management process is an on-going part of managing the software development process.
- It is designed to be a continuous feedback loop where additional information and risk status are utilized to refine the project’s risk list and risk management plans.
Risk Management Plan can be created by using following template:
| Risk No. | Risk Category/Sub Category ** | Date of Risk Identification | Risk Description | Impact of Risk (9/3/1) | Probability of Occurrence (9/3/1) | Risk Quantification (Impact of Risk Probability of Occurrence) | *Mitigation Plan Refers to the actions to be taken to minimize the occurrence of risk |
Contingency Plan Refers to the actions to be taken when the perceived risk becomes a reality |
Date on which Risk Occurred | Affected Groups | Person / Group (horizontal/vertical) Responsible | Open / Closed | Date of Risk Closure | Remarks |
| 1. |
Also Read : What is Credit Risk ? | Methodology and Stages Explained